 |
| My newest studio helper |
But as Bowen has gotten older his naps don't usually coincide with Olivia's naps, so now my bench time is that much more precious. I apologize if I don't update my blog a whole lot; it's just something I've had to cut out along with listing jewelry for sale online.
A while ago I found some old steel cut buttons in an antique store. They were from the estate of a button collector, lovingly arranged on a card. I took one off to give to a friend who loves romantic-vintage stuff like that. The second one came off the card today when I was creating this sampler necklace inspired by another that sold right after I made it.
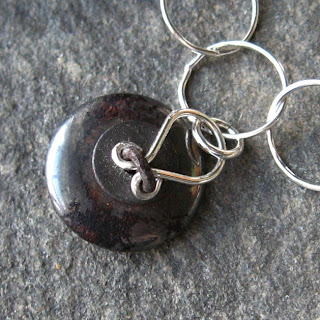
The floral centerpiece is a PMC piece I made, and the dangles include freshwater pearls, vintage crystals, sterling silver beads, quartz, and an antique button from my precious stash. If you've ever tried to dangle a shank button without having it tip forward or altering the shank, you know my challenge for today's studio time. Now I'm sharing my tricks with you. Here is the bail I created as a solution.
 |
| Reverse side |
Forming the loops after putting the wire through the shank is harder than it looks, especially when using half-hard wire. Once I did that, though, I squeezed the loops tight around the shank so the bail wouldn't jiggle. Then I pressed the top of the bail forward so it would sit close to the top of the button (the center of gravity) to prevent the whole thing from tipping forward.
I did something similar with a big, orphan bead cap that has been laying on my bench for awhile. Rather than capping a huge bead, I wanted to frame a small pearl but I didn't want it to hang face-down.
I threaded the pearl, bead cap, and a small sterling bead onto a headpin, which I then bent sharply so it would stay put. I bent the headpin to follow the contour of the bead cap, through a hole in the cap's edge, and into a hanging loop.


3 comments:
Anne, I was so touched when you had those goodies for me at ArtBLISS! ;-) I LOVE what you made here - this necklace is such a classic and the bail you created is genius. It can be so difficult to work with old buttons if you don't want to alter the shank.
Great necklace! Love the charms and the large jumpring chain.
I really have to comment on your studio helper though. What a cutie! I'd get nothing done but stare and play if I had that one around! :-)
I just love how you attached the buttons, so pretty and functional. Great work!
- Molly
Post a Comment