
Friday, August 07, 2015
On the move...
During my jewelry hiatus I had a chance to redesign my website, and with that comes an integrated blog. I'll keep this one up for now, but you can join me over at the new site to see what's new... http://annemade-jewelry.com/blog/
Wednesday, March 04, 2015
Creative Itch
I am taking a break from making jewelry, but it is allowing me to explore other creative things and media. I wrote about it over on my other blog... Here's a link.

Thursday, November 20, 2014
Interview an Artist
My sweet friend Kaitlyn, one of our babysitters when we lived in Virginia, is a second-year arts student at a state university. She's switching her concentration Metals, and I couldn't be more thrilled for her. She emailed me about an assignment the other day, and I think it is a wise one for the professor to assign: Interview an artist. I think it would be great for art students to do this every semester! Unless they are around artisans on a regular basis or plan to teach, I think there's a degree of disconnect between what they think being an artist will be like and what it typically is like.

I chuckled a little when Kaitlyn sent me the questions because I still don't see myself as an artist even though I've been creating little artworks with my hands professionally for ten years. Anyway, I thought I'd share my interview here so you can learn a little more about me.
1. Would you share with me what were some of your initial experiences with art?
My mom had these craft idea books for kids, everything from paint/glue/egg cartons to macrame. When I was bored sometimes I would just sit and look at the projects. My great aunt was a rock hound, mining and polishing rubies and opals and semiprecious stones even as an old lady. I had a rock tumbler and learned to wrap those slippery little things in wire to create pendants. This was around middle school age, and at the same time I was also into making things out of polymer clay, mixing custom colors and stringing the beads I made. My source for beads back then was a catalog, and I remember freaking out when my wish list exceeded $100. Now that's pretty common. :) As a kid I also liked to sew and crochet and paint, and I did all of that up through high school and took a creativity break during college.
2. When did you decide to be an artist, and how did you know?
I took a drawing class as part of my Liberal Arts curriculum, but otherwise the bulk of my art instruction was 8th-12th grade, mostly drawing, painting, and printmaking. I toyed with the idea of studying Art Ed in college, but decided to study biology because I also love medicine and the human body and I figured that field was more employable. After college I worked a desk job while Steve was in grad school, and by the time he graduated I was burnt out so he suggested taking some time off. I would walk our puppy down along the Delaware River (we lived in Old New Castle, Delaware at the time) and I started collecting sea glass. I drew on my experience of wire wrapping, and linked the pieces together to make necklaces. In March 2004 my friend/mentor, Debora, was visiting and saw me wearing one of these necklaces. She has always kind of been a mentor to me, both spiritually and artistically, and she suggested making a business out of my jewelry. I had never even thought of that, but she had a big trunk show at her house and made an appointment with a clothing store to purchase wholesale, so that is how my business got started. So to answer the question I never really decided to be an artist! I just always was, to some degree. Getting to do that for work was just icing on the cake.
3. Where did you grow up?
Winchester, Virginia.
4. What was your family unit? Did you have brothers or sisters?
I have a brother who is two years older. My parents still live in the house where I grew up. My mom is big into sewing clothes and quilting, and she nurtured my creative spirit when I was growing up.
5. Did you have artistic peers growing up? In high school? In college?
I had friends in my art classes, but they weren't close friends. My neighbor-friend who lived up the street was not only boy-crazy (her room was plastered with New Kids on the Block posters) but also a good painter. For one birthday she gave me a set of Windsor & Newton watercolor tubes, and that was one of the best gifts I ever got as a kid. Now she's a housewife/mom/painter in Atlanta, but we lost touch for many years because she moved during high school so I can't say she really influenced my art. I would say in general I haven't had that many friends who could be called artistic; sometimes I feel like I have this secret creative life that my friends don't really know/care about because they can't relate. Like, they may know I make jewelry but they probably have no idea what it looks like, but that's okay because I'm pretty independent. I tend to turn to the online community when I need feedback or inspiration in my creative life.
6. Were there teachers that influenced you? How so?
My drawing professor in college would give me Bs and Cs without telling me how I could have improved my work, so that was really discouraging and I didn't take any other art classes. Before that my art and PAVAN teachers in high school were cool people, encouraging, and gave interesting assignments so that was much more inspiring. Whenever I take jewelry workshops I always love how laid-back the instructors are, encouraging us to develop our own style.
7. What was the most important thing you learned in school?
Figure out who you are and be that person.
8. Do you have mentors or other working artists who influence you today?
Debora Haughton, an interior designer who is more of a mentor in terms of general creativity and being an entrepreneur. Also, since I sold jewelry at a shop downtown, the shop owner helped me develop jewelry lines that suited her customers.
9. Would you say your occupation is the same as your career?
Yes, I suppose. I have two jobs, jewelry designer and mom/wife. Because we're in Sweden for a few years I've had to take a step back from the first one due to lack of space and tools, and to reset my priorities. I fully intend to return, though!
10. Did you have any benchmarks in your career? By the time I’m X, I’ll have done Y?
Nope. Although I think setting goals is good, I haven't been very good at it. Because my priority is my family I said from the beginning that I don't want my business to become an empire, which is why I named it AnneMade Jewelry. There are dozens of ways I could be building and promoting my business, but while the kids are at home I want to keep it manageable for just me to wear all the hats (design, construction, shipping, invoicing, accounting, etc).
11. Were there any gatekeepers in the art world for you, people who either let you in or barred the way as you were coming through?
I didn't really try to go through that gate. It does help to know people!
12. Is there any professional organization that you joined that you found particularly helpful to your career?
In Delaware I was part of the Chamber of Commerce as a small business owner, so that helped make connections among merchants. I was looking into being part of the Delaware Arts Alliance when we decided to move to Virginia, so I didn't get to it. Same thing with the Shenandoah Arts Council when we moved to Sweden.
13. What do you think are the major turning points in your career?
Shifting my business sales from retail (home parties) to wholesale (selling through stores). I'm sorry, but people can be a pain to deal with! I'm happy to pay someone else to sell my work and deal with customers. Being able to say no to something that wasn't fun anymore was very empowering.
14. What’s been your interaction with or relation to the public over the years?
I have done a few public shows where I have met some wonderful, long-term customers, but in general I prefer not to deal with the general public. My feelings get hurt when I overhear someone saying that they could make a piece themselves for less, or criticizing the design in some way. I also think it's too much work to set up, sell in, and take down a booth at a venue over and over in order to peddle my wares.
15. What kind of control do you think you exert over your own destiny as an artist?
Lots! There are definitely things I can't control, but I'm pretty confident in my talent and the quality and style of my products, so I think that speaks for itself. Finding the right niche is important, so being able to recognize when something (a design, a venue, a pricing structure) is not working and then change course is also important. Just keep trying different things until you find a niche that works for you.
16. What are you own criteria for success as an artist?
Mental fulfillment and validation outside my role in the family. I am really thankful that my business was profitable from the beginning and we don't have to rely on income from it in order to pay for rent and groceries, so any pressure to succeed came from myself.
17. Has money or critical success influenced your artistic decision making?
Ooh that's a good question! I guess I'll say money because I don't care if I'm famous or if I win any awards, but I do care if my pieces sell. It got to the point where I'd be taking last-minute Christmas orders for men who don't plan ahead, and then burning out and dreading Christmas each year. When I set a deadline early in December I could close my studio door and enjoy the season.
18. Are you satisfied with your career as an artist?
Yes.
19. What do you think is your greatest disappointment in your professional career?
The realization that making jewelry was more fun than being a mom of little ones, but being a mom is more important. That's why I didn't bring any tools here to Sweden, to enforce a break and reset my priorities.
What has been you greatest success?
Buying a new car in cash with the money I had made. Sure, Steve could afford to (and wanted to) pay for it, but I was so proud to have earned that money and saved it up instead of reinvesting in cool components or spending it on other things.
20. What advice would you give someone who wanted to be an artist today, as opposed to when you started?
Art doesn't have to be your career or define you. You can always do art even if you can't afford to take the plunge and make it your sole source of income. Also, not everyone you know will understand your need to be creative and make things, but you can be friends for other reasons.

We've been living in Sweden for almost nine months, and it's going really well. You can read about our adventures on my family blog. I do miss making jewelry, but it has given me the chance to refocus and so I am planning to bring back a few tools when I'm back in the States over Christmas. I wish you all a safe and wonderful Thanksgiving!
I chuckled a little when Kaitlyn sent me the questions because I still don't see myself as an artist even though I've been creating little artworks with my hands professionally for ten years. Anyway, I thought I'd share my interview here so you can learn a little more about me.
1. Would you share with me what were some of your initial experiences with art?
My mom had these craft idea books for kids, everything from paint/glue/egg cartons to macrame. When I was bored sometimes I would just sit and look at the projects. My great aunt was a rock hound, mining and polishing rubies and opals and semiprecious stones even as an old lady. I had a rock tumbler and learned to wrap those slippery little things in wire to create pendants. This was around middle school age, and at the same time I was also into making things out of polymer clay, mixing custom colors and stringing the beads I made. My source for beads back then was a catalog, and I remember freaking out when my wish list exceeded $100. Now that's pretty common. :) As a kid I also liked to sew and crochet and paint, and I did all of that up through high school and took a creativity break during college.
2. When did you decide to be an artist, and how did you know?
I took a drawing class as part of my Liberal Arts curriculum, but otherwise the bulk of my art instruction was 8th-12th grade, mostly drawing, painting, and printmaking. I toyed with the idea of studying Art Ed in college, but decided to study biology because I also love medicine and the human body and I figured that field was more employable. After college I worked a desk job while Steve was in grad school, and by the time he graduated I was burnt out so he suggested taking some time off. I would walk our puppy down along the Delaware River (we lived in Old New Castle, Delaware at the time) and I started collecting sea glass. I drew on my experience of wire wrapping, and linked the pieces together to make necklaces. In March 2004 my friend/mentor, Debora, was visiting and saw me wearing one of these necklaces. She has always kind of been a mentor to me, both spiritually and artistically, and she suggested making a business out of my jewelry. I had never even thought of that, but she had a big trunk show at her house and made an appointment with a clothing store to purchase wholesale, so that is how my business got started. So to answer the question I never really decided to be an artist! I just always was, to some degree. Getting to do that for work was just icing on the cake.
3. Where did you grow up?
Winchester, Virginia.
4. What was your family unit? Did you have brothers or sisters?
I have a brother who is two years older. My parents still live in the house where I grew up. My mom is big into sewing clothes and quilting, and she nurtured my creative spirit when I was growing up.
5. Did you have artistic peers growing up? In high school? In college?
I had friends in my art classes, but they weren't close friends. My neighbor-friend who lived up the street was not only boy-crazy (her room was plastered with New Kids on the Block posters) but also a good painter. For one birthday she gave me a set of Windsor & Newton watercolor tubes, and that was one of the best gifts I ever got as a kid. Now she's a housewife/mom/painter in Atlanta, but we lost touch for many years because she moved during high school so I can't say she really influenced my art. I would say in general I haven't had that many friends who could be called artistic; sometimes I feel like I have this secret creative life that my friends don't really know/care about because they can't relate. Like, they may know I make jewelry but they probably have no idea what it looks like, but that's okay because I'm pretty independent. I tend to turn to the online community when I need feedback or inspiration in my creative life.
6. Were there teachers that influenced you? How so?
My drawing professor in college would give me Bs and Cs without telling me how I could have improved my work, so that was really discouraging and I didn't take any other art classes. Before that my art and PAVAN teachers in high school were cool people, encouraging, and gave interesting assignments so that was much more inspiring. Whenever I take jewelry workshops I always love how laid-back the instructors are, encouraging us to develop our own style.
7. What was the most important thing you learned in school?
Figure out who you are and be that person.
8. Do you have mentors or other working artists who influence you today?
Debora Haughton, an interior designer who is more of a mentor in terms of general creativity and being an entrepreneur. Also, since I sold jewelry at a shop downtown, the shop owner helped me develop jewelry lines that suited her customers.
9. Would you say your occupation is the same as your career?
Yes, I suppose. I have two jobs, jewelry designer and mom/wife. Because we're in Sweden for a few years I've had to take a step back from the first one due to lack of space and tools, and to reset my priorities. I fully intend to return, though!
10. Did you have any benchmarks in your career? By the time I’m X, I’ll have done Y?
Nope. Although I think setting goals is good, I haven't been very good at it. Because my priority is my family I said from the beginning that I don't want my business to become an empire, which is why I named it AnneMade Jewelry. There are dozens of ways I could be building and promoting my business, but while the kids are at home I want to keep it manageable for just me to wear all the hats (design, construction, shipping, invoicing, accounting, etc).
11. Were there any gatekeepers in the art world for you, people who either let you in or barred the way as you were coming through?
I didn't really try to go through that gate. It does help to know people!
12. Is there any professional organization that you joined that you found particularly helpful to your career?
In Delaware I was part of the Chamber of Commerce as a small business owner, so that helped make connections among merchants. I was looking into being part of the Delaware Arts Alliance when we decided to move to Virginia, so I didn't get to it. Same thing with the Shenandoah Arts Council when we moved to Sweden.
13. What do you think are the major turning points in your career?
Shifting my business sales from retail (home parties) to wholesale (selling through stores). I'm sorry, but people can be a pain to deal with! I'm happy to pay someone else to sell my work and deal with customers. Being able to say no to something that wasn't fun anymore was very empowering.
14. What’s been your interaction with or relation to the public over the years?
I have done a few public shows where I have met some wonderful, long-term customers, but in general I prefer not to deal with the general public. My feelings get hurt when I overhear someone saying that they could make a piece themselves for less, or criticizing the design in some way. I also think it's too much work to set up, sell in, and take down a booth at a venue over and over in order to peddle my wares.
15. What kind of control do you think you exert over your own destiny as an artist?
Lots! There are definitely things I can't control, but I'm pretty confident in my talent and the quality and style of my products, so I think that speaks for itself. Finding the right niche is important, so being able to recognize when something (a design, a venue, a pricing structure) is not working and then change course is also important. Just keep trying different things until you find a niche that works for you.
16. What are you own criteria for success as an artist?
Mental fulfillment and validation outside my role in the family. I am really thankful that my business was profitable from the beginning and we don't have to rely on income from it in order to pay for rent and groceries, so any pressure to succeed came from myself.
17. Has money or critical success influenced your artistic decision making?
Ooh that's a good question! I guess I'll say money because I don't care if I'm famous or if I win any awards, but I do care if my pieces sell. It got to the point where I'd be taking last-minute Christmas orders for men who don't plan ahead, and then burning out and dreading Christmas each year. When I set a deadline early in December I could close my studio door and enjoy the season.
18. Are you satisfied with your career as an artist?
Yes.
19. What do you think is your greatest disappointment in your professional career?
The realization that making jewelry was more fun than being a mom of little ones, but being a mom is more important. That's why I didn't bring any tools here to Sweden, to enforce a break and reset my priorities.
What has been you greatest success?
Buying a new car in cash with the money I had made. Sure, Steve could afford to (and wanted to) pay for it, but I was so proud to have earned that money and saved it up instead of reinvesting in cool components or spending it on other things.
20. What advice would you give someone who wanted to be an artist today, as opposed to when you started?
Art doesn't have to be your career or define you. You can always do art even if you can't afford to take the plunge and make it your sole source of income. Also, not everyone you know will understand your need to be creative and make things, but you can be friends for other reasons.
We've been living in Sweden for almost nine months, and it's going really well. You can read about our adventures on my family blog. I do miss making jewelry, but it has given me the chance to refocus and so I am planning to bring back a few tools when I'm back in the States over Christmas. I wish you all a safe and wonderful Thanksgiving!
Sunday, January 05, 2014
Changes
AnneMade Jewelry is about to celebrate its 10th anniversary! I've been making jewelry since I was a kid, but I took a break during college and picked it back up after I started collecting sea glass when we moved to Delaware in 2003. We were new in town, I was looking for work, and my mentor from home (Virginia) saw a necklace I had made and encouraged me to make a business out of it. And so I did. And then we moved to Virginia and AnneMade Jewelry continued to evolve and flourish. When our kids came along it was great because I could work from home while they were sleeping. And last year I even worked from a studio downtown while they were in preschool. Bliss! But then...
 My husband was asked to spend 2-3 years working at his company's office in Gothenburg, Sweden beginning in February. (!) Amidst the shock of learning about the move and thinking of the dozens of things we needed to do before then, I had this thought whispering in the recesses of my mind... What if I took a break from work and just enjoyed being there? Making jewelry has become less like recreation and more like a job, so I'm looking forward to a break from special orders, inventory, deadlines, paperwork, shipping, and ordering supplies. After ten years of that I welcome a sabbatical. I look forward to having time to read, meet friends for fika (coffee date), take pictures, and go for walks. I'll still bring my jewelry tools because creating is still something I enjoy doing. I'm even looking forward to meeting Swedish jewelry people.
I'm planning to document our Swedish adventures on my family blog, maybe a little here too when it relates, and I will definitely be pinning away. My jewelry will still be available at Simply Charming Boutique in Winchester, Virginia, and my jewelry tutorials will still be available on the AnneMade Jewelry website and Etsy. I'm excited to go to Sweden, and I'm pretty sure I'll be excited to come home to my studio, too.

I'm planning to document our Swedish adventures on my family blog, maybe a little here too when it relates, and I will definitely be pinning away. My jewelry will still be available at Simply Charming Boutique in Winchester, Virginia, and my jewelry tutorials will still be available on the AnneMade Jewelry website and Etsy. I'm excited to go to Sweden, and I'm pretty sure I'll be excited to come home to my studio, too.
Thursday, August 22, 2013
Etched Nickel Components
It's been a quiet summer in my studio. My little ones are home and it's a slower time for sales, plus there are things going on behind the scenes that have hijacked my attention, so I enjoyed having a little break from making jewelry. But preschool is starting back up and I'm itching to work on ideas that have been swirling around in my head.
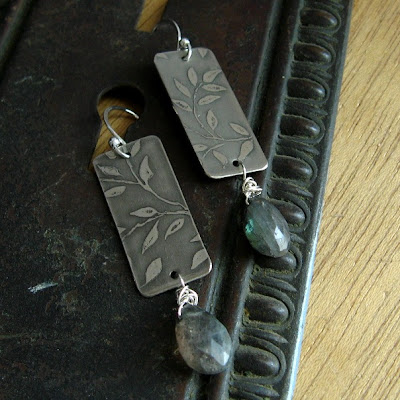
I have etched copper using chemicals or saltwater, but there is an unused sheet of nickel silver that has been sitting in my studio for years. I bought it on a whim back when I used to be able to hop on a train and shop for supplies in New York City for the day. (I laughed out loud when I saw how little I had paid for it!) Because it contains nickel, an element that causes a skin irritation for some people, I hadn't used it in any of my metalwork yet. It's not as soft as sterling, doesn't actually contain any silver, and doesn't polish up as brightly either, so it is kind of the black sheep of the white metals family. But I remember making a note to myself that this stuff can be etched like copper with supplies found at Radio Shack, unlike silver. And thanks to my trolling Pinterest during summer break (ahem), I got the idea to make etched nickel silver components for drop earrings. The earwires would be sterling silver, and no other part touches skin.
 I had another unused product I had bought a while ago, a StazOn ink pad, which is supposed to stick to all kinds of non-paper surfaces. I applied it to a rubber stamp, then stamped that on the cleaned surface of the metal. After that dried I filled in a little with a fine Sharpie, then let it go swimming in ferric chloride. (Parents, please do not let your children swim in ferric chloride. It will stain their swimsuits.)
After etching and neutralizing I oxidized it with Black Max, which was surprising because it doesn't work on copper, but I prefer it on silver because it's faster, easier, more color-neutral, and less smelly than liver of sulfur (and reusable). Then I polished off the raised areas and am really tickled with the results. I can tell which leaves were added with the marker, but I'm okay with that.
I had intended to make fat rectangles for the earring components, but after I cut one I decided it would look better (and go further) halved into long rectangles. I like linear earrings anyway; they're more flattering to the face and less likely for the nickel to touch the skin as well. I don't mind the muted gray of the nickel, as opposed to the bright white of the sterling silver. It pairs well with labradorite, which has its own interesting, stormy look going on.
Here is another pair with white freshwater pearls.

I have etched copper using chemicals or saltwater, but there is an unused sheet of nickel silver that has been sitting in my studio for years. I bought it on a whim back when I used to be able to hop on a train and shop for supplies in New York City for the day. (I laughed out loud when I saw how little I had paid for it!) Because it contains nickel, an element that causes a skin irritation for some people, I hadn't used it in any of my metalwork yet. It's not as soft as sterling, doesn't actually contain any silver, and doesn't polish up as brightly either, so it is kind of the black sheep of the white metals family. But I remember making a note to myself that this stuff can be etched like copper with supplies found at Radio Shack, unlike silver. And thanks to my trolling Pinterest during summer break (ahem), I got the idea to make etched nickel silver components for drop earrings. The earwires would be sterling silver, and no other part touches skin.

After etching and neutralizing I oxidized it with Black Max, which was surprising because it doesn't work on copper, but I prefer it on silver because it's faster, easier, more color-neutral, and less smelly than liver of sulfur (and reusable). Then I polished off the raised areas and am really tickled with the results. I can tell which leaves were added with the marker, but I'm okay with that.
I had intended to make fat rectangles for the earring components, but after I cut one I decided it would look better (and go further) halved into long rectangles. I like linear earrings anyway; they're more flattering to the face and less likely for the nickel to touch the skin as well. I don't mind the muted gray of the nickel, as opposed to the bright white of the sterling silver. It pairs well with labradorite, which has its own interesting, stormy look going on.

Here is another pair with white freshwater pearls.

Friday, March 22, 2013
Tree of Life

How could I resist? Plus, unlike some well-meaning sweet husbands I work with, Keith had a good idea of what he wanted. "My thoughts were a chunky rectangular bracelet or necklace with a family tree design, with possibly the kids' names and/or birthstones somehow incorporated. I want the center of the piece to simply state 'BLESSED', because everyday we are blessed to have her in our lives." He even sent me pictures of different jewelry pieces he liked so I knew we were on the same page. I sketched (a rarity - I usually just start sawing and stamping)...

...and he tweaked the design, and finally this is what I created.
 |
| Dillion is Irish, meaning "faithful" |
I love the oxidized sterling, the chunky chain, how the focal piece is curved to fit her wrist. I even used the compound leaf* stamp for probably the first time since I bought it several years ago. The trunk was created with I and Y stamps, and I added serifs to the B to make the block capital look prettier with the lowercase Kismet font stamps. Most importantly, Keith loved the finished product and gave me permission to share his sweet words about his wife.
*See? I'm totally using my Biology degree. A compound leaf is one in which several leaflets share a single petiole. I bet you didn't know I was a plant nerd. Don't get me started on whorled leaves!
.jpg)
Saturday, March 16, 2013
Spring collection
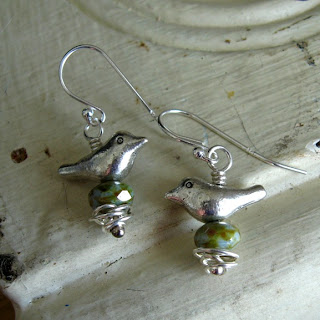
I love birds. My husband kind of scowls but laughs whenever I bring anything else bird-themed into our house. (He gave me bird things for Christmas, though, so I think he's catching on that they're not going anywhere.) And bird stuff is everywhere, so apparently I'm not the only one who loves it. Again this year I did some bird-inspired pieces in my spring collection for Simply Charming Boutique.


Of course there has to be a little pink & green for our beloved Apple Blossom Festival, too.


...and birthstone stacking rings that are made to order.


Happy Spring!


Of course there has to be a little pink & green for our beloved Apple Blossom Festival, too.

Brenda (from the shop) encouraged me to do some more artisan-looking pieces like my Elements line, so there is a larger presence of wirework...


...and birthstone stacking rings that are made to order.

I also played around with some empty sterling bezels on copper. I could fill them with polymer clay or resin, but I liked how they looked with just the metal.

Since Fall
Hi again! It has been a while since I updated this so thanks for your patience. It's not because all my free time is spent on Pinterest, I promise.
Starting in September I rented studio space downtown close to where my kids go to preschool. It was glorious being able to drop them off and then walk to work, making jewelry for hours on end without the distraction of the computer or housework (ahem) until my alarm told me to go back and pick the kids up. I showed you a little of my Sonoma line, and after that I did a grouping with Swarovski-set components (like this focal) as part of my Facets collection.


Starting in September I rented studio space downtown close to where my kids go to preschool. It was glorious being able to drop them off and then walk to work, making jewelry for hours on end without the distraction of the computer or housework (ahem) until my alarm told me to go back and pick the kids up. I showed you a little of my Sonoma line, and after that I did a grouping with Swarovski-set components (like this focal) as part of my Facets collection.

I am still working with colored stone briolettes for my Facets collection as well, and I hated to see this pair of cluster earrings go...
 |
| Purple, pink, and orange! |
Also I can't get enough of those big honkin' Chinese crystals, so I did some long necklaces and wire rings featuring those for the holiday season.

But after Christmas change was in the air. The pedestrian mall was torn up for an infrastructure upgrade and facelift, and it has been interesting to watch all the work going on just outside my studio.
 |
| Cutting down "my" tree, piece by piece |
 |
| Along my commute |
I decided not to renew my lease downtown after my spring collection was delivered to the shop, but instead move my tools back home again (for now).
It actually isn't because of the construction. This is the time of year when I get to focus on other things! For example, my jewelry friend Judy and I recently played with CopprClay, a copper version of PMC that will likely be paired with turquoise in my Sonoma collection in the fall.
 |
| Goodbye, studio |
 |
| I love the torched patina on the left one |
Friday, October 12, 2012
Beaded Laughter
I just found a new blog that makes me giggle: Beaded Laughter.
It's kind of like the Ryan Gosling homeschooler memes, but for jewelry makers.

Thank you, Pinterest. My life is even more fun because of you.
It's kind of like the Ryan Gosling homeschooler memes, but for jewelry makers.

Thank you, Pinterest. My life is even more fun because of you.
Tuesday, October 02, 2012
Polishing without polish
Fall is in full swing here (!) and along with decorating with bittersweet and baking apple and pumpkin recipes, my traditions include plugging in the instant-hot-water faucet that I've unplugged over the summer. It was one of the unexpected things when we moved into our house that we've really enjoyed. I can make tea, oatmeal, and hot chocolate in an instant. I can warm up a baby bottle without the microwave. And today I found yet another use.
I have a few pieces of jewelry that have been in my personal collection for a little while, and try as I might they wind up tarnished. Normally I use a silver polishing cloth, silver dip, or throw the items into the tumbler to polish up the sterling silver, but these particular pieces contain turquoise and freshwater pearls which are easy to harm with traditional polishing techniques. And the wirework prevents me from reaching all the nooks and crannies. I remember back a few years reading about a method using hot water and baking soda, so I tried it.
I lined a baking dish with aluminum foil, then poured in a few teaspoons of baking soda and salt. Then I filled it with water from my instant-hot tap (you can boil water separately and pour it in), stirred it up, and put my jewelry in. It can take a few minutes, but I could see the change right away. Bright, sparkly silver with no damage to my turquoise or pearls, and no chemicals.
 |
| Wire Crochet set (tutorial here) |
I lined a baking dish with aluminum foil, then poured in a few teaspoons of baking soda and salt. Then I filled it with water from my instant-hot tap (you can boil water separately and pour it in), stirred it up, and put my jewelry in. It can take a few minutes, but I could see the change right away. Bright, sparkly silver with no damage to my turquoise or pearls, and no chemicals.
Subscribe to:
Posts (Atom)