Showing posts with label Wirework. Show all posts

Thursday, November 20, 2014

Interview an Artist

My sweet friend Kaitlyn, one of our babysitters when we lived in Virginia, is a second-year arts student at a state university.  She's switching her concentration Metals, and I couldn't be more thrilled for her.  She emailed me about an assignment the other day, and I think it is a wise one for the professor to assign: Interview an artist.  I think it would be great for art students to do this every semester!  Unless they are around artisans on a regular basis or plan to teach, I think there's a degree of disconnect between what they think being an artist will be like and what it typically is like.


I chuckled a little when Kaitlyn sent me the questions because I still don't see myself as an artist even though I've been creating little artworks with my hands professionally for ten years.  Anyway, I thought I'd share my interview here so you can learn a little more about me.

1. Would you share with me what were some of your initial experiences with art? 

My mom had these craft idea books for kids, everything from paint/glue/egg cartons to macrame. When I was bored sometimes I would just sit and look at the projects. My great aunt was a rock hound, mining and polishing rubies and opals and semiprecious stones even as an old lady. I had a rock tumbler and learned to wrap those slippery little things in wire to create pendants. This was around middle school age, and at the same time I was also into making things out of polymer clay, mixing custom colors and stringing the beads I made. My source for beads back then was a catalog, and I remember freaking out when my wish list exceeded $100. Now that's pretty common. :) As a kid I also liked to sew and crochet and paint, and I did all of that up through high school and took a creativity break during college. 

2. When did you decide to be an artist, and how did you know? 
I took a drawing class as part of my Liberal Arts curriculum, but otherwise the bulk of my art instruction was 8th-12th grade, mostly drawing, painting, and printmaking. I toyed with the idea of studying Art Ed in college, but decided to study biology because I also love medicine and the human body and I figured that field was more employable. After college I worked a desk job while Steve was in grad school, and by the time he graduated I was burnt out so he suggested taking some time off. I would walk our puppy down along the Delaware River (we lived in Old New Castle, Delaware at the time) and I started collecting sea glass. I drew on my experience of wire wrapping, and linked the pieces together to make necklaces. In March 2004 my friend/mentor, Debora, was visiting and saw me wearing one of these necklaces. She has always kind of been a mentor to me, both spiritually and artistically, and she suggested making a business out of my jewelry. I had never even thought of that, but she had a big trunk show at her house and made an appointment with a clothing store to purchase wholesale, so that is how my business got started. So to answer the question I never really decided to be an artist! I just always was, to some degree. Getting to do that for work was just icing on the cake.

3. Where did you grow up? 
Winchester, Virginia.

4. What was your family unit? Did you have brothers or sisters? 
I have a brother who is two years older. My parents still live in the house where I grew up. My mom is big into sewing clothes and quilting, and she nurtured my creative spirit when I was growing up.

5. Did you have artistic peers growing up? In high school? In college?
I had friends in my art classes, but they weren't close friends. My neighbor-friend who lived up the street was not only boy-crazy (her room was plastered with New Kids on the Block posters) but also a good painter. For one birthday she gave me a set of Windsor & Newton watercolor tubes, and that was one of the best gifts I ever got as a kid. Now she's a housewife/mom/painter in Atlanta, but we lost touch for many years because she moved during high school so I can't say she really influenced my art. I would say in general I haven't had that many friends who could be called artistic; sometimes I feel like I have this secret creative life that my friends don't really know/care about because they can't relate. Like, they may know I make jewelry but they probably have no idea what it looks like, but that's okay because I'm pretty independent.  I tend to turn to the online community when I need feedback or inspiration in my creative life.

6. Were there teachers that influenced you? How so? 
My drawing professor in college would give me Bs and Cs without telling me how I could have improved my work, so that was really discouraging and I didn't take any other art classes. Before that my art and PAVAN teachers in high school were cool people, encouraging, and gave interesting assignments so that was much more inspiring. Whenever I take jewelry workshops I always love how laid-back the instructors are, encouraging us to develop our own style.

7. What was the most important thing you learned in school? 
Figure out who you are and be that person.

8. Do you have mentors or other working artists who influence you today? 
Debora Haughton, an interior designer who is more of a mentor in terms of general creativity and being an entrepreneur. Also, since I sold jewelry at a shop downtown, the shop owner helped me develop jewelry lines that suited her customers.

9. Would you say your occupation is the same as your career?
Yes, I suppose. I have two jobs, jewelry designer and mom/wife.  Because we're in Sweden for a few years I've had to take a step back from the first one due to lack of space and tools, and to reset my priorities. I fully intend to return, though!

10. Did you have any benchmarks in your career? By the time I’m X, I’ll have done Y? 
Nope. Although I think setting goals is good, I haven't been very good at it. Because my priority is my family I said from the beginning that I don't want my business to become an empire, which is why I named it AnneMade Jewelry. There are dozens of ways I could be building and promoting my business, but while the kids are at home I want to keep it manageable for just me to wear all the hats (design, construction, shipping, invoicing, accounting, etc).

11. Were there any gatekeepers in the art world for you, people who either let you in or barred the way as you were coming through?
I didn't really try to go through that gate. It does help to know people!

12. Is there any professional organization that you joined that you found particularly helpful to your career?
In Delaware I was part of the Chamber of Commerce as a small business owner, so that helped make connections among merchants. I was looking into being part of the Delaware Arts Alliance when we decided to move to Virginia, so I didn't get to it. Same thing with the Shenandoah Arts Council when we moved to Sweden.

13. What do you think are the major turning points in your career? 
Shifting my business sales from retail (home parties) to wholesale (selling through stores). I'm sorry, but people can be a pain to deal with! I'm happy to pay someone else to sell my work and deal with customers. Being able to say no to something that wasn't fun anymore was very empowering.

14. What’s been your interaction with or relation to the public over the years? 
I have done a few public shows where I have met some wonderful, long-term customers, but in general I prefer not to deal with the general public. My feelings get hurt when I overhear someone saying that they could make a piece themselves for less, or criticizing the design in some way. I also think it's too much work to set up, sell in, and take down a booth at a venue over and over in order to peddle my wares.

15. What kind of control do you think you exert over your own destiny as an artist? 
Lots! There are definitely things I can't control, but I'm pretty confident in my talent and the quality and style of my products, so I think that speaks for itself. Finding the right niche is important, so being able to recognize when something (a design, a venue, a pricing structure) is not working and then change course is also important. Just keep trying different things until you find a niche that works for you.

16. What are you own criteria for success as an artist? 
Mental fulfillment and validation outside my role in the family. I am really thankful that my business was profitable from the beginning and we don't have to rely on income from it in order to pay for rent and groceries, so any pressure to succeed came from myself.

17. Has money or critical success influenced your artistic decision making? 
Ooh that's a good question! I guess I'll say money because I don't care if I'm famous or if I win any awards, but I do care if my pieces sell. It got to the point where I'd be taking last-minute Christmas orders for men who don't plan ahead, and then burning out and dreading Christmas each year. When I set a deadline early in December I could close my studio door and enjoy the season.

18. Are you satisfied with your career as an artist? 
Yes.

19. What do you think is your greatest disappointment in your professional career? 
The realization that making jewelry was more fun than being a mom of little ones, but being a mom is more important. That's why I didn't bring any tools here to Sweden, to enforce a break and reset my priorities.

What has been you greatest success? 
Buying a new car in cash with the money I had made. Sure, Steve could afford to (and wanted to) pay for it, but I was so proud to have earned that money and saved it up instead of reinvesting in cool components or spending it on other things.

20. What advice would you give someone who wanted to be an artist today, as opposed to when you started? 
Art doesn't have to be your career or define you. You can always do art even if you can't afford to take the plunge and make it your sole source of income. Also, not everyone you know will understand your need to be creative and make things, but you can be friends for other reasons.


We've been living in Sweden for almost nine months, and it's going really well. You can read about our adventures on my family blog.  I do miss making jewelry, but it has given me the chance to refocus and so I am planning to bring back a few tools when I'm back in the States over Christmas.  I wish you all a safe and wonderful Thanksgiving!

Saturday, March 16, 2013

Spring collection

I love birds.  My husband kind of scowls but laughs whenever I bring anything else bird-themed into our house.  (He gave me bird things for Christmas, though, so I think he's catching on that they're not going anywhere.)  And bird stuff is everywhere, so apparently I'm not the only one who loves it.  Again this year I did some bird-inspired pieces in my spring collection for Simply Charming Boutique.


Of course there has to be a little pink & green for our beloved Apple Blossom Festival, too.


Brenda (from the shop) encouraged me to do some more artisan-looking pieces like my Elements line, so there is a larger presence of wirework...


...and birthstone stacking rings that are made to order.


I also played around with some empty sterling bezels on copper.  I could fill them with polymer clay or resin, but I liked how they looked with just the metal.


Happy Spring!

Since Fall

Hi again!  It has been a while since I updated this so thanks for your patience.  It's not because all my free time is spent on Pinterest, I promise.

Starting in September I rented studio space downtown close to where my kids go to preschool.  It was glorious being able to drop them off and then walk to work, making jewelry for hours on end without the distraction of the computer or housework (ahem) until my alarm told me to go back and pick the kids up.  I showed you a little of my Sonoma line, and after that I did a grouping with Swarovski-set components (like this focal) as part of my Facets collection.


I am still working with colored stone briolettes for my Facets collection as well, and I hated to see this pair of cluster earrings go...

Purple, pink, and orange!

Also I can't get enough of those big honkin' Chinese crystals, so I did some long necklaces and wire rings featuring those for the holiday season.


But after Christmas change was in the air.  The pedestrian mall was torn up for an infrastructure upgrade and facelift, and it has been interesting to watch all the work going on just outside my studio.

Cutting down "my" tree, piece by piece

Along my commute

I decided not to renew my lease downtown after my spring collection was delivered to the shop, but instead move my tools back home again (for now).

Goodbye, studio
It actually isn't because of the construction. This is the time of year when I get to focus on other things!  For example, my jewelry friend Judy and I recently played with CopprClay, a copper version of PMC that will likely be paired with turquoise in my Sonoma collection in the fall.

I love the torched patina on the left one

Tuesday, October 02, 2012

Polishing without polish

Fall is in full swing here (!) and along with decorating with bittersweet and baking apple and pumpkin recipes, my traditions include plugging in the instant-hot-water faucet that I've unplugged over the summer.  It was one of the unexpected things when we moved into our house that we've really enjoyed.  I can make tea, oatmeal, and hot chocolate in an instant.  I can warm up a baby bottle without the microwave.  And today I found yet another use. 


Wire Crochet set (tutorial here)
I have a few pieces of jewelry that have been in my personal collection for a little while, and try as I might they wind up tarnished.  Normally I use a silver polishing cloth, silver dip, or throw the items into the tumbler to polish up the sterling silver, but these particular pieces contain turquoise and freshwater pearls which are easy to harm with traditional polishing techniques.  And the wirework prevents me from reaching all the nooks and crannies.  I remember back a few years reading about a method using hot water and baking soda, so I tried it. 

I lined a baking dish with aluminum foil, then poured in a few teaspoons of baking soda and salt.  Then I filled it with water from my instant-hot tap (you can boil water separately and pour it in), stirred it up, and put my jewelry in.  It can take a few minutes, but I could see the change right away.  Bright, sparkly silver with no damage to my turquoise or pearls, and no chemicals.

Tuesday, August 07, 2012

Sonoma sampler necklace

When I don't know what to make, or I don't have enough of any one component to make a whole necklace, I make what I call a sampler.  It's not really a sampler per se, more like a charm quilt where every square is made from a different scrap of fabric.  But to me "charm necklace" still conjures up images of plastic charm necklaces from the 80s so I use the term "sampler."

I digress.  I'm on a turquoise-copper-silver kick right now, so the latest addition to my Sonoma line is this necklace.


It started with this pendant, which is a section of copper water pipe with a nugget of turquoise pinned on silver wire.


Pinning, in this case, is using a torch to ball the end of a wire, trapping something on it.  If you use a lame torch like the one on my bench that is really meant for caramelizing the top of crème brûlée, you might burn your stone before balling the wire.  Not that that ever happens to me.  (Note to self: Get the oxy/acetaline Little Torch out of the shed because it would be awesome at pinning.)  I have a habit of losing interest in a necklace once I finish the pendant, and then I just stick it on a chain and call a day.  Either that or my kids wake up from their naps and my creative streak is curtailed.  Anyway, I thought this pinned pipe pendant deserved something more than a chain, something more artful and creative, so I created the sampler necklace.  But then it became so busy and visually heavy that the pendant was better off being showcased on a chain.  And so I made a different pendant, slightly larger and plainer, for the sampler. 


This picture was taken in my studio, and I purposefully didn't crop out my tan line to prove (to my mother who reads this) that I have a dress on.  See that little swatch at the bottom edge?  Also in the background you can see my card catalogues, which make awesome bead-strand storage.  (My local library in Delaware went digital around the same time I was making jewelry there, so I taught beading at summer library camp in exchange for their old card catalogues.)

Wednesday, July 18, 2012

Use what you have

There's a decorating concept called "use what you have" which is a low-budget way of drawing from your current accessory stash to freshen up the look of a room in your house.  It forces you to be creative instead of shelling out money for more components.  I needed to make a grouping of earrings to take to the shop, something to fill in and coordinate with my summer and fall collections, so I challenged myself to draw from the components I already have instead of ordering parts. 

I chose to draw from various sizes of jump rings left over from when I used to sell chain maille kits.  I didn't want to make chain maille earrings per se, but I did hook rings together using a mixture of different textures to make it more interesting.  Added some goldfill bubble chain and rings into the mix for a bimetal look, and voila.


There are some shaggy loops and subtle nods to Japanese maille, but not really any chain maille patterns. I also cut discs and washers from my precious patterned silver, which I have been hoarding for years.  (Actually, I think it's considered hoardering since I can order more.  No, hoardering is not the act of ordering multiple drinks right before happy hour ends, but ordering more of the prized items in my bead stash just so I don't have to use them up.)

What do you have in your (kitchen, closet, studio) that you can use instead of buying more?

Monday, July 02, 2012

More Sonoma

The next pieces in the Sonoma series...

Etched copper caps


Raku glazed ceramic


The last pair is my favorite so far, inspired by what Kristi Bowman did with her copper components.  The copper components have oak leaves and acorns, and sterling silver rivets attach it to the turquoise wheels. 

It took me as long to photograph, post, and describe those earrings as it did to actually make them.  This is why I am so grateful to outsource my selling.  That being said, I'm building up my inventory for a fall grouping at the shop, which means these will be sitting in my studio until then.  If you're dying to have something, let me know.  anne@annemade-jewelry.com  Earrings are around $28-36 to give you an idea.

A word about Sonoma...  My mom asked if I knew Sonoma isn't in Arizona and I got all defensive but then realized maybe it needs an explanation so others can see what's in my head. Although featuring copper and turquoise, I don't intend for this line to look "southwestern."  The turquoise isn't the bright, clear stuff from Sleeping Beauty mine that is commonly found in inlaid Native American jewelry.  There will be no silver feathers, squash blossoms, or scalloped bezels.  I wanted it to have more of a "western" feel... My inspiration includes horses...

These guys were the backdrop of our Girlfriend Getaway in June

... their leather tack and silver stirrups, and also wine country (hence the name): a little bit rustic and rugged. 
Hillsborough Winery in the rain

Here's a question for the lurkers: Would you wear copper earwires?  For example the raku glazed ceramic earrings above have only copper so I think it might look odd to put sterling hooks on, but I think some people are unable/afraid to wear anything but gold or sterling (which is silver+copper).

Stay cool out there and THINK FALL!

Thursday, June 28, 2012

Sonoma debut

Just talking about the copper and turquoise had me itching to make some.  So after the kiddos were in bed last night I had a go.  I have several designs swimming around in my head, and I actually have some paper sketches I made in a frenzy after I *dreamed* about this.  (My dreams tend to vaporize the moment my feet hit the floor.)  Dreaming about jewelry is more of a sickness, really. It doesn't go away at night like so many people's jobs. 

Enough talk, here are some pictures.

Copper, bronze, turquoise nuggets

Torch-enameled flower buds, copper plate


Raku ceramic, boro lampwork, copper


Saturday, February 11, 2012

Wire Button Bail

Hi, gang.  I have been sqeezing in studio time here and there, working on a grouping for the shop downtown.  When my son was born in October he slept all the time, so I was able to keep making jewelry for the Christmas season. 

My newest studio helper

But as Bowen has gotten older his naps don't usually coincide with Olivia's naps, so now my bench time is that much more precious.  I apologize if I don't update my blog a whole lot; it's just something I've had to cut out along with listing jewelry for sale online. 

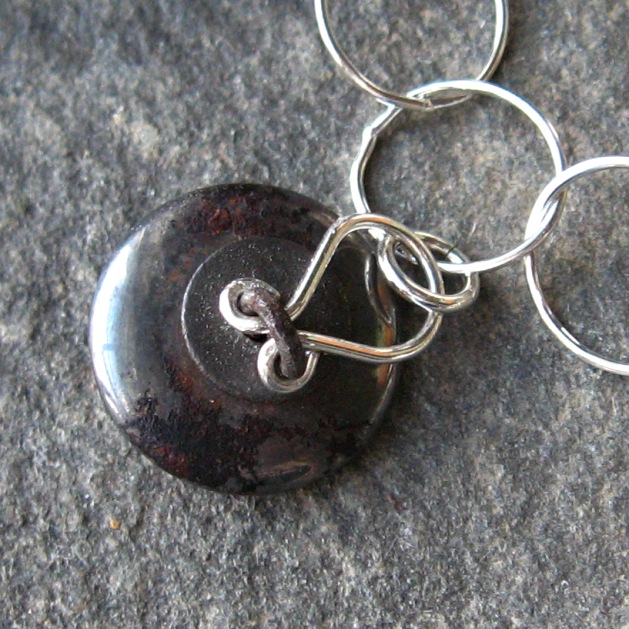
A while ago I found some old steel cut buttons in an antique store.  They were from the estate of a button collector, lovingly arranged on a card.  I took one off to give to a friend who loves romantic-vintage stuff like that.  The second one came off the card today when I was creating this sampler necklace inspired by another that sold right after I made it. 


The floral centerpiece is a PMC piece I made, and the dangles include freshwater pearls, vintage crystals, sterling silver beads, quartz, and an antique button from my precious stash.  If you've ever tried to dangle a shank button without having it tip forward or altering the shank, you know my challenge for today's studio time.  Now I'm sharing my tricks with you.  Here is the bail I created as a solution.

Reverse side

Forming the loops after putting the wire through the shank is harder than it looks, especially when using half-hard wire.  Once I did that, though, I squeezed the loops tight around the shank so the bail wouldn't jiggle.  Then I pressed the top of the bail forward so it would sit close to the top of the button (the center of gravity) to prevent the whole thing from tipping forward.


I did something similar with a big, orphan bead cap that has been laying on my bench for awhile.  Rather than capping a huge bead, I wanted to frame a small pearl but I didn't want it to hang face-down.


I threaded the pearl, bead cap, and a small sterling bead onto a headpin, which I then bent sharply so it would stay put.  I bent the headpin to follow the contour of the bead cap, through a hole in the cap's edge, and into a hanging loop.


Friday, December 09, 2011

Jewelry making: The gift that keeps on giving

I got this email today:
"Dear Anne,
I would like to buy a quality kit and tutorial for my 14 year old niece who is very creative. However, I can only spend about $30.00. Do you have any suggestions?  Thank you for your help.
Warmly, Jennifer"

First of all, it sounds like Jennifer is gunning for Cool Aunt status.  What a neat idea for a Christmas gift.  I suggested she keep it simple and stick to one type of jewelry: earrings.  Simple drop earrings are a really basic technique but one can do a lot with it just by varying the size, shape, and color of the beads. Maybe add a bead cap, or with a pair of beads try the big bead on the bottom vs. the big bead on the top.  I suggested that Jennifer print out the supply list my Earring Basics tutorial and head to the craft store. 

If you want to put together a kit for someone on your Christmas gift list to make simple drop earrings, she'll need round-nose and chain-nose pliers, wire cutters, packages of headpins and earhooks, some practice wire around 20-24 gauge and (if there's room in the budget) a small assortment of beads.  That way you've provided what the recipient needs to practice making loops and then several pairs of earrings.  Then she can pick out more beads on her own to suit her taste.  Plus, with that practice wire and her extra beads she can make a Link Bracelet (free tutorial download).

Jewelry making: The gift that keeps on giving!

Tuesday, November 29, 2011

Turquoise

It's a birthstone for December, but I didn't realize that until I had this grouping tagged and ready to go to Simply Charming Boutique.  (Speaking of, the shop is now open on Sundays from noon to five for weekend shoppers.)  Here's a peek of the collection for the rest of the world...


Happy birthday, December babies!

Friday, November 11, 2011

Messy Wraps

A lot of things I do go in phases.  I get obsessed, I wear it out, I move on.  Okay, maybe not quite that extreme, but I am pretty fickle about what I'm into; it's always subject to change.  One trend I've noticed in my wirework is a departure from perfect wrapped loops...

Free tutorial on my website
(Link Bracelet)

...in favor of something more organic looking.  I call these messy wraps.


They kinda remind me of tornado beads.


Sure, messy wraps use more wire than coiling, but we're talking about 22- to 26-gauge "little guy" wire here. And it's actually easier for me to tuck in the tip of the wire if I do messy wraps instead of perfect coils on briolettes.  Dare I say they look more interesting as well?


And messy wraps are a subtle nod to my beloved bird's nests.


But wait!  There's more!  The other day I was on a turquoise kick and strung some simple strands of beads into necklaces.  (Why do I always feel like I have to come up with something new and different when making jewelry?  Why do I fight the feeling that *just* stringing beads is uninspired?  Sometimes simple is elegant.)  This is actually a strand of chrysocolla, but it coordinated nicely with the turquoise grouping. 

I wanted the wearer to be able to put this willow toggle clasp at the front, and I love twisted crimps because they feel so solid, but I don't think they're pretty enough for the front of a necklace (left side of photo).  And they're too big and flat to fit inside my 2mm crimp covers so necessity led to invention.  Rather than order and patiently wait for larger crimp covers, I messy-wrapped the crimps in fine-gauge wire (right side of photo).  This also helps take up slack if you decide that your stringing wire is a bit too long after you crimp.  Not that this ever happens to me.